
Currently Empty: ₨0.00

0 Comments
Floor tiles can make a home look beautiful, modern, and durable. However, discovering cracks in newly installed tiles can be frustrating, especially after investing time and money in your flooring project. So, why do floor tiles crack after installation?
In most cases, cracked floor tiles result from poor surface preparation, uneven flooring, incorrect tile adhesive, improper installation, or movement in the underlying floor. Additionally, heavy impacts, temperature changes, and insufficient expansion gaps can contribute to the problem.
The good news is that many of these issues are preventable. By choosing suitable floor tiles, preparing the subfloor properly, and following the correct installation process, homeowners can reduce the risk of cracks and enjoy long-lasting flooring.
In this guide, we explain the common causes of cracked floor tiles, practical prevention methods, and what to do when tiles start cracking.
What Causes Floor Tiles to Crack After Installation?
Floor tiles usually crack when they experience more stress than they can withstand. Although tile quality matters, installation techniques and the condition of the surface underneath are equally important.
Here are the most common reasons floor tiles develop cracks after installation.
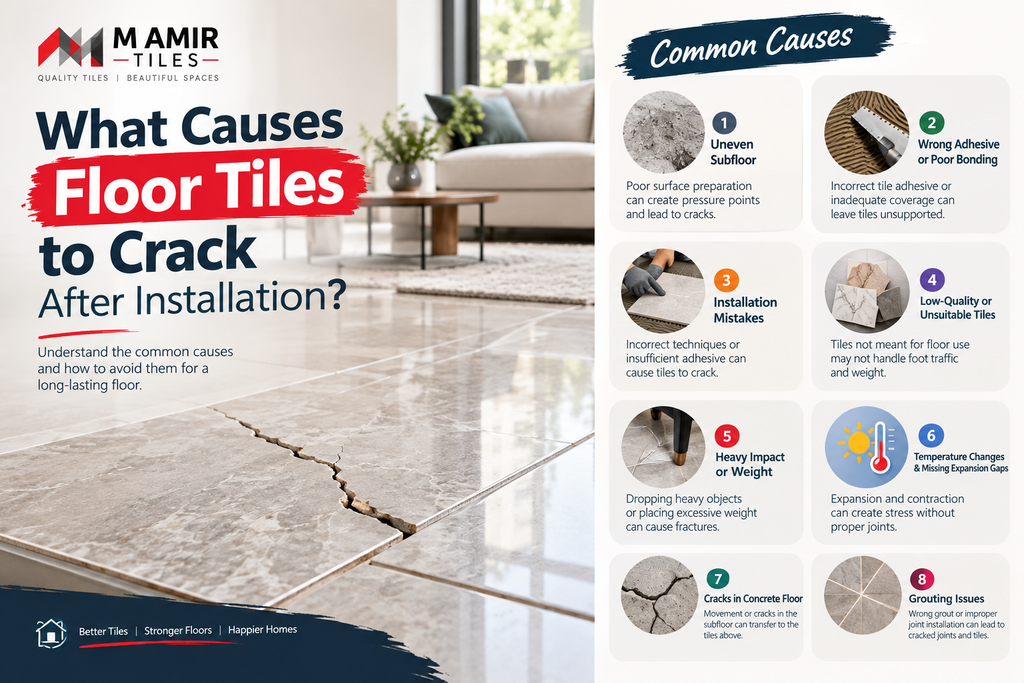
1. Uneven or Poorly Prepared Subfloor
One of the most common causes of cracked floor tiles is an uneven or poorly prepared subfloor.
Before installing tiles, the floor surface must be stable, clean, and sufficiently level. Otherwise, certain areas may receive more pressure than others. As a result, tiles can bend slightly under load and eventually crack.
For example, if a heavy piece of furniture rests on a tile that has an unsupported section underneath, the pressure may cause the tile to break.
How to prevent it:
- Check the floor for uneven areas before installation.
- Remove dust, loose material, grease, and debris.
- Repair cracks or damaged sections in the subfloor.
- Use an appropriate levelling compound where necessary.
- Allow the prepared surface to cure as required before laying tiles.
Therefore, proper surface preparation should always come before tile installation.
2. Incorrect Tile Adhesive or Tile Bond
The adhesive used during installation plays an important role in supporting floor tiles. If the wrong adhesive is selected, or if it is mixed and applied incorrectly, the tiles may not bond properly to the surface.
Consequently, unsupported areas can develop beneath the tiles. When people walk over these areas or place heavy objects on them, the tiles may crack.
Using ordinary cement and sand in situations that require a suitable tile adhesive can also contribute to bonding problems.
How to prevent it:
- Select a tile adhesive suitable for the tile type and installation surface.
- Follow the manufacturer’s mixing and application instructions.
- Apply the adhesive evenly using the appropriate notched trowel.
- Ensure sufficient adhesive coverage beneath each tile.
- Observe the recommended curing time before walking on the new floor.
When purchasing tiles and installation materials, homeowners should consider both product quality and compatibility. M Amir Tiles can be a starting point for exploring flooring options for your home. Visit mamirtile.com to explore available tile products.
3. Poor Tile Installation Techniques
Even good-quality tiles can crack when installers use incorrect techniques.
For instance, applying adhesive only to the centre or corners of a tile can leave unsupported spaces. Similarly, placing tiles on an inadequately prepared surface can create weak points.
As the floor receives regular foot traffic, these weak areas may develop cracks.
Common installation mistakes include:
- Leaving air pockets beneath tiles.
- Applying insufficient adhesive.
- Failing to align tiles correctly.
- Installing tiles before the surface is ready.
- Walking on newly installed tiles too soon.
- Using the wrong installation method for the tile size or type.
Prevention tip: Hire an experienced tile installer who follows the tile manufacturer’s recommendations. Proper adhesive coverage and careful installation can significantly reduce the risk of cracking.
4. Low-Quality or Unsuitable Floor Tiles
Not every tile is suitable for every room or application. Tiles differ in strength, thickness, manufacturing quality, and intended use.
For example, a tile designed primarily for wall applications may not be appropriate for a high-traffic floor. Likewise, a tile that is unsuitable for the expected load may crack under regular use.
However, price alone does not determine tile quality. The intended application, product specifications, and installation requirements should also guide your decision.
How to prevent it:
- Choose tiles specifically rated for floor use.
- Check the manufacturer’s specifications and recommended applications.
- Consider the expected foot traffic and load.
- Inspect tiles for visible defects before installation.
- Purchase enough tiles from a suitable batch to maintain consistency.
At M Amir Tiles, homeowners can explore tile options for different interior spaces and compare styles when planning a flooring project.
5. Heavy Impact or Excessive Weight
Sometimes, floor tiles crack even when installation has been completed correctly. In these cases, sudden impact or concentrated weight may be responsible.
For instance, dropping a heavy metal object onto a tile can cause a chip or fracture. Similarly, placing heavy furniture or equipment on a poorly supported section can increase stress on the tile.
Although many floor tiles are designed for everyday use, they are not completely resistant to impact damage.
Prevention tips:
- Use protective pads beneath heavy furniture.
- Avoid dragging heavy appliances across tiled floors.
- Lift heavy objects instead of dropping them.
- Distribute heavy loads appropriately.
- Use suitable protective coverings during renovation work.
As a result, careful handling can help prevent unnecessary damage to your flooring.
6. Temperature Changes and Missing Expansion Gaps
Flooring materials can expand and contract as temperatures change. This movement is usually small, but it can create stress when the floor has insufficient space to accommodate it.
For example, direct sunlight, underfloor heating, or substantial temperature variations can contribute to movement in certain installations.
If tiles are installed tightly against walls without appropriate perimeter or movement joints, pressure can build up. In severe cases, tiles may crack, lift, or detach from the surface.
How to prevent it:
- Follow the recommended expansion and movement-joint requirements.
- Leave appropriate perimeter gaps where specified.
- Use suitable flexible sealants at designated movement joints.
- Follow specialist guidance for large floors and sun-exposed areas.
- Use installation systems appropriate for underfloor heating where applicable.
Importantly, grout joints do not replace the need for properly designed movement joints.
7. Cracks or Movement in the Concrete Floor
Sometimes, the problem starts beneath the tiles rather than in the tiles themselves.
If the concrete slab or screed develops cracks, shifts, or settles unevenly, the movement may transfer to the tiled surface. Consequently, tiles can crack along the same line as the underlying floor.
This problem may occur in new buildings, poorly prepared subfloors, or areas affected by settlement.
How to prevent it:
- Inspect the subfloor before installing tiles.
- Allow concrete and screed to cure properly.
- Investigate significant or recurring cracks before covering them.
- Use a suitable crack-isolation system where appropriate.
- Seek professional advice if structural movement is suspected.
Covering an active crack without addressing the underlying movement may only provide a temporary solution.
8. Incorrect Grouting and Joint Installation
Grout fills the spaces between tiles and helps create a finished, sealed appearance. However, grout alone cannot compensate for poor installation or movement beneath the floor.
If grout is applied incorrectly, the joints may crack or crumble. In some cases, this damage appears before the tiles themselves begin to crack.
Additionally, grout joints that are too narrow for the tile system or unsuitable for the installation conditions may contribute to problems.
How to prevent it:
- Choose grout suitable for the tile type and environment.
- Follow the recommended joint width.
- Mix and apply grout according to the manufacturer’s instructions.
- Allow the grout to cure properly.
- Provide movement joints where required.
If grout repeatedly cracks in the same area, investigate the underlying cause rather than simply replacing the grout.
Quick Comparison: Causes of Cracked Floor Tiles and Their Solutions
The following table summarises the main causes and the most effective prevention measures.
| Cause | Common warning sign | Prevention |
|---|---|---|
| Uneven subfloor | Cracks in high-pressure areas | Level and prepare the surface |
| Poor adhesive coverage | Hollow-sounding tiles | Ensure suitable adhesive coverage |
| Incorrect installation | Loose or repeatedly cracked tiles | Use proper installation techniques |
| Unsuitable tile selection | Breakage under normal loads | Select tiles rated for floor use |
| Heavy impact | Localised chips or fractures | Protect tiles from impact |
| Missing movement joints | Cracks or lifting across an area | Provide appropriate movement joints |
| Subfloor movement | Cracks following a line | Investigate and address the movement |
| Grouting problems | Cracked or crumbling joints | Use suitable grout and joint details |
Remember that one symptom can have several possible causes. Therefore, inspect the affected area before deciding on a repair.
How to Prevent Floor Tiles from Cracking After Installation
Preventing cracked floor tiles starts before the first tile is laid. By following a systematic approach, homeowners can reduce installation problems and protect their flooring investment.
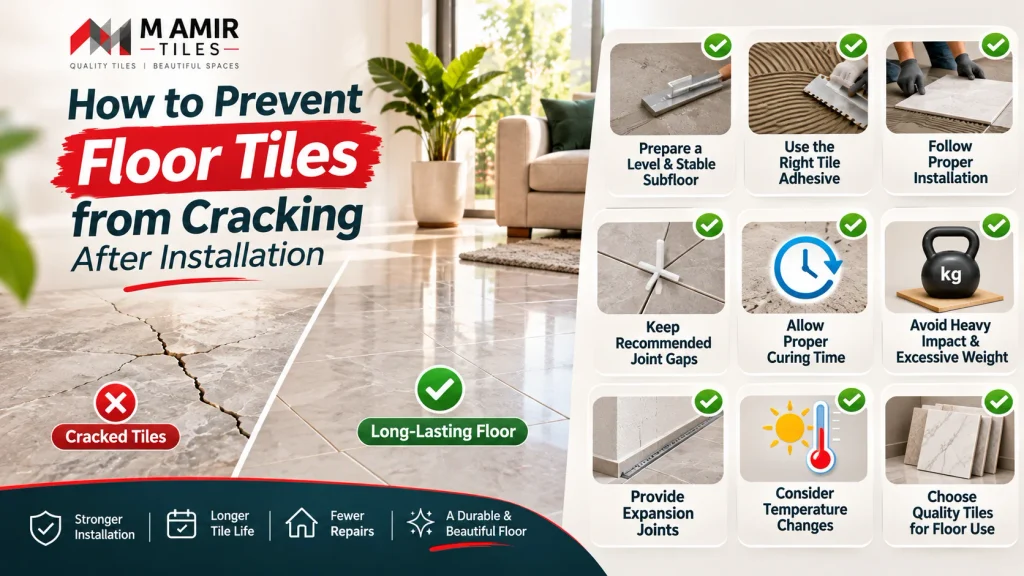
1. Choose the Right Tiles for Each Room
First, consider how the room will be used.
Kitchen floors, living rooms, bathrooms, and outdoor areas have different requirements. For example, a busy kitchen may need durable floor tiles that can withstand frequent foot traffic and occasional impacts.
Before purchasing, check:
- Whether the tile is suitable for floor installation.
- Its durability and relevant technical specifications.
- Whether its surface suits the intended environment.
- Whether its size and thickness are appropriate for the installation.
- The manufacturer’s recommended installation method.
M Amir Tiles offers a place to explore flooring options and plan a suitable look for your home. Choosing the right product for the intended application is an important first step.
2. Prepare the Floor Properly
Next, ensure the subfloor is stable, clean, and level within the tolerances required by the tile system.
Do not install tiles over loose material, unresolved cracks, or an unsuitable surface. Otherwise, even carefully selected tiles may develop problems later.
In addition, follow the recommended curing requirements for concrete, screed, and levelling compounds.
3. Use Suitable Tile Adhesive
Always match the adhesive to the tile, substrate, and environmental conditions.
Large-format tiles, for example, may require a different adhesive and application technique from smaller tiles. Furthermore, some surfaces need specialist preparation or a compatible primer.
Follow the product instructions instead of adding extra water or changing the mixture without guidance.
4. Ensure Proper Adhesive Coverage
Adequate adhesive coverage helps support the tile and reduces unsupported spaces beneath it.
Installers should use the appropriate trowel and installation technique. Back-buttering may also be necessary for certain large-format tiles or specific installation conditions.
The aim is to achieve the coverage required by the applicable installation standards and manufacturer’s instructions.
5. Allow Sufficient Curing Time
Although a newly tiled floor may look finished, the adhesive and grout need time to develop their required strength.
Walking on the floor too early can disturb the bond or shift the tiles. Similarly, placing heavy furniture before the recommended time may damage the installation.
Therefore, follow the curing times specified for the actual products and site conditions.
6. Protect the Floor After Installation
Finally, protect your new flooring during the remaining construction or furnishing work.
Use suitable protective coverings, avoid dragging equipment across the tiles, and take care when moving heavy objects.
These simple steps can help prevent impact damage and unnecessary stress on the newly installed surface.
What Should You Do If Your Floor Tiles Have Already Cracked?
If you notice cracked tiles, do not immediately assume that the tiles themselves are defective. Instead, examine the damage and look for signs of an underlying problem.
Follow these steps:
- Inspect the crack: Determine whether it affects one tile, several tiles, or the grout joints.
- Check the surrounding area: Look for loose tiles, hollow sounds, lifting edges, or recurring cracks.
- Identify possible causes: Consider impact damage, poor adhesive coverage, subfloor cracks, or movement.
- Repair the underlying issue: Address the cause before replacing the damaged tile.
- Replace the tile if necessary: A badly fractured tile usually needs replacement rather than a cosmetic repair.
If cracks appear across several tiles in a line, or if the floor is lifting, seek professional assessment before carrying out repairs. These symptoms may indicate movement beneath the tiled surface.
Can Cracked Floor Tiles Be Repaired Without Replacing Them?
Minor surface chips may sometimes be repaired with a suitable tile repair product. However, a tile that has fractured through its body generally requires replacement for a durable result.
Replacing a damaged tile without correcting the original cause can lead to the same problem again.
For this reason, professional assessment is especially useful when several tiles have cracked or the damage keeps returning.
Common Mistakes to Avoid When Installing Floor Tiles
Even small mistakes can reduce the life of a tiled floor. Fortunately, most can be avoided with proper planning.
Avoid these common errors:
- Choosing tiles based only on appearance or price.
- Using wall tiles in floor applications without confirming suitability.
- Installing tiles on an uneven or unstable surface.
- Using an unsuitable adhesive or incorrect mixing ratio.
- Leaving significant unsupported spaces beneath tiles.
- Ignoring cracks in the underlying concrete or screed.
- Skipping required movement joints.
- Allowing heavy traffic before the adhesive has cured.
- Assuming cracked grout is always just a grout problem.
Instead, focus on product suitability, correct installation, and proper maintenance. Together, these factors provide a stronger foundation for long-lasting flooring.
How to Choose Quality Floor Tiles for Your Home in Pakistan
When shopping for floor tiles in Pakistan, homeowners often compare designs, prices, finishes, and sizes. However, technical suitability is just as important as appearance.
To make a better decision, consider the following factors.
Tile Quality and Intended Use
Choose tiles designed for the room where they will be installed. Check the manufacturer’s specifications, including strength, thickness, and recommended applications.
Tile Size and Installation Requirements
Large-format tiles can create a clean, modern appearance. Nevertheless, they require a suitably prepared surface and the correct installation technique.
Therefore, discuss the installation requirements with your supplier and installer before making a final selection.
Surface Finish and Maintenance
Different finishes suit different spaces. For example, a floor with frequent water exposure may require an appropriate slip-resistant finish.
Also, consider cleaning requirements, foot traffic, and the overall design of the room.
Products by Category
-
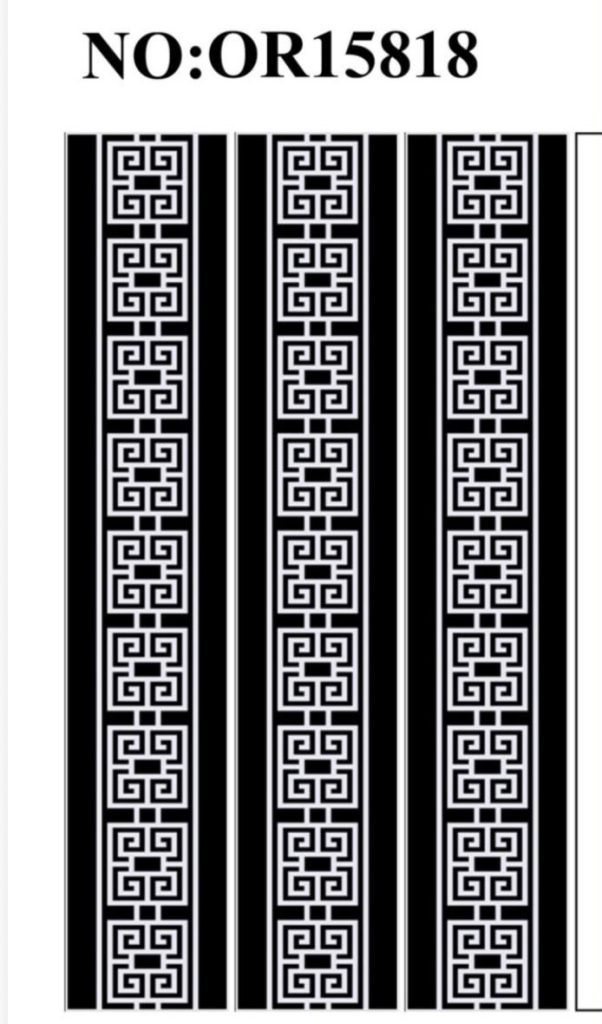
Oreal Ceramics Decorative Border Linear Accent Tile 6×32 – Black & White
₨1,750.00 -

Oreal Ceramics Matt Porcelain Floor Tile 24×24 (600×600 mm) – Beige Brown & Charcoal Grey
₨1,750.00 -

Oreal Ceramics Matt Porcelain Floor Tile 24×24 (600×600 mm) – Dark Charcoal & Graphite
₨1,750.00 -
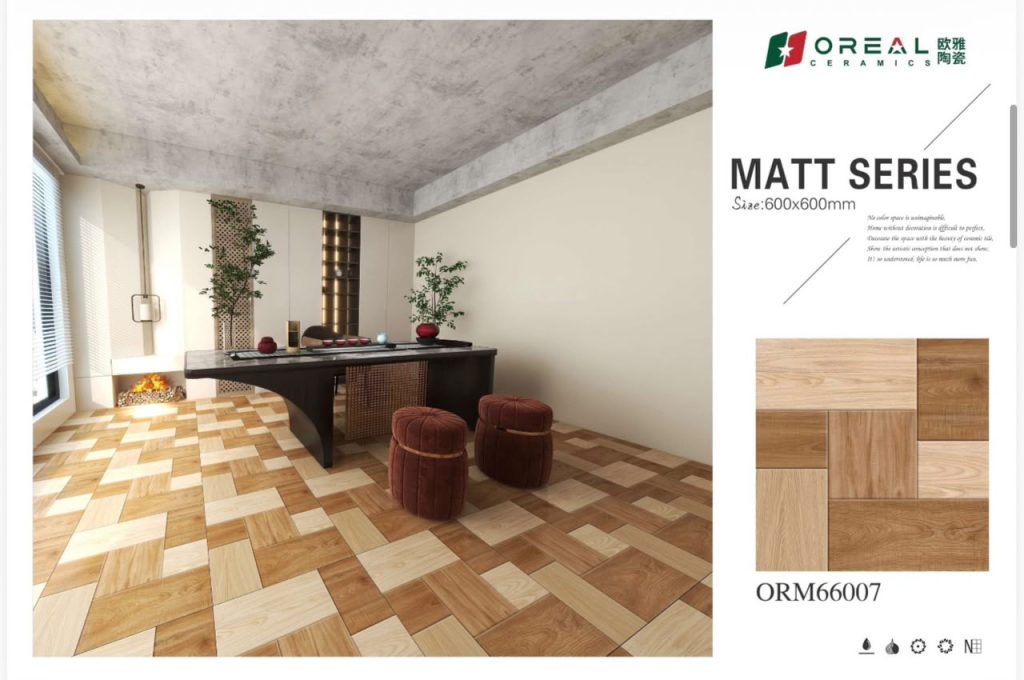
Oreal Ceramics Matt Porcelain Floor Tile 24×24 (600×600 mm) – Honey Oak & Rich Amber Brown
₨1,750.00 -

Oreal Ceramics Matt Porcelain Floor Tile 24×24 (600×600 mm) – Light Grey & Pearl
₨1,750.00 -

Oreal Ceramics Matt Porcelain Floor Tile 24×24 (600×600 mm) – Ocean Teal & Slate Blue
₨1,750.00 -

Oreal Ceramics Matt Porcelain Floor Tile 24×24 (600×600 mm) – Slate Grey & Charcoal
₨1,750.00 -

Oreal Ceramics Matt Porcelain Floor Tile 24×24 (600×600 mm) – Slate Grey & Rust Amber
₨1,750.00 -
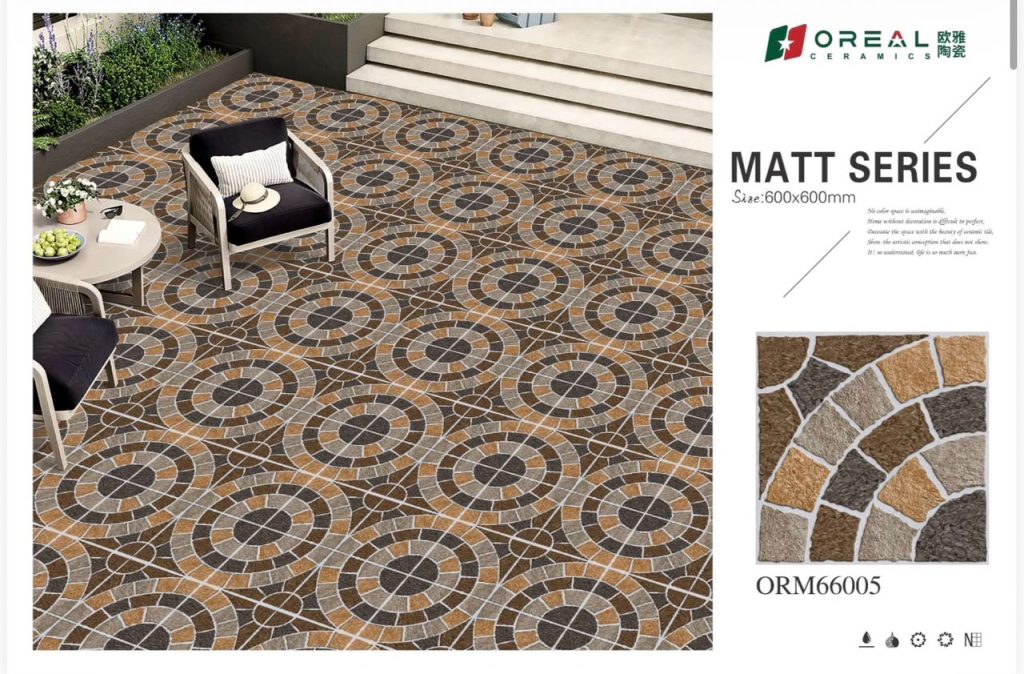
Oreal Ceramics Matt Porcelain Floor Tile 24×24 (600×600 mm) – Terracotta Orange & Charcoal Grey
₨1,750.00
Reliable Product Selection
A good flooring project involves more than choosing an attractive tile. The product must also be suitable for the expected conditions and installed correctly.
M Amir Tiles helps homeowners explore tile options for residential projects. Visit M Amir Tiles to review available products and find inspiration for your next flooring project.
Read more : Local vs Imported Tiles in Pakistan: Which Should You Choose?
Frequently Asked Questions About Why Floor Tiles Crack
Why do floor tiles crack a few days after installation?
Floor tiles may crack shortly after installation because of poor adhesive coverage, an uneven subfloor, premature foot traffic, or movement beneath the floor. Inspect the damaged area to identify the cause before replacing the tile.
Can poor-quality tile adhesive cause floor tiles to crack?
Yes. Unsuitable adhesive or incorrect application can leave unsupported areas beneath tiles. These areas may experience excessive stress under foot traffic, potentially causing the tiles to crack.
Do cracked floor tiles mean the tiles are low quality?
Not necessarily. Even good-quality tiles can crack because of poor installation, heavy impact, subfloor movement, or inadequate adhesive coverage. The cause should be assessed before blaming the tile itself.
How can I stop floor tiles from cracking?
Choose tiles suitable for floor use, prepare the subfloor properly, use compatible adhesive, ensure adequate coverage, allow sufficient curing time, and provide required movement joints.
Should I replace a cracked floor tile immediately?
A severely cracked tile should generally be replaced, particularly if it creates a sharp edge or presents a safety risk. However, first investigate the cause so the replacement tile does not develop the same problem.
Are large floor tiles more likely to crack?
Not automatically. Large-format tiles can perform well when they are suitable for the application and installed on a properly prepared surface with appropriate adhesive coverage. However, their installation requirements can be more demanding.
Final Thoughts
Understanding why floor tiles crack after installation can help homeowners avoid costly repairs and make better flooring decisions.
Although poor installation, unsuitable adhesive, uneven subfloors, heavy impacts, and structural movement are common causes, many problems can be reduced through proper preparation and careful product selection.
Start by choosing tiles designed for your intended space. Then, ensure that the floor is stable, the adhesive is suitable, and the installer follows the correct installation procedure.
For homeowners planning a new flooring project, M Amir Tiles is a useful place to explore tile options and gather ideas for residential interiors.
Choose suitable tiles, install them correctly, and protect your investment with proper care.
Visit mamirtile.com to explore flooring options for your next home improvement project.